> ## Documentation Index
> Fetch the complete documentation index at: https://docs.brew.new/llms.txt
> Use this file to discover all available pages before exploring further.
# Automations
> Emails Brew sends automatically in response to events. Build marketing flows and transactional emails with AI.
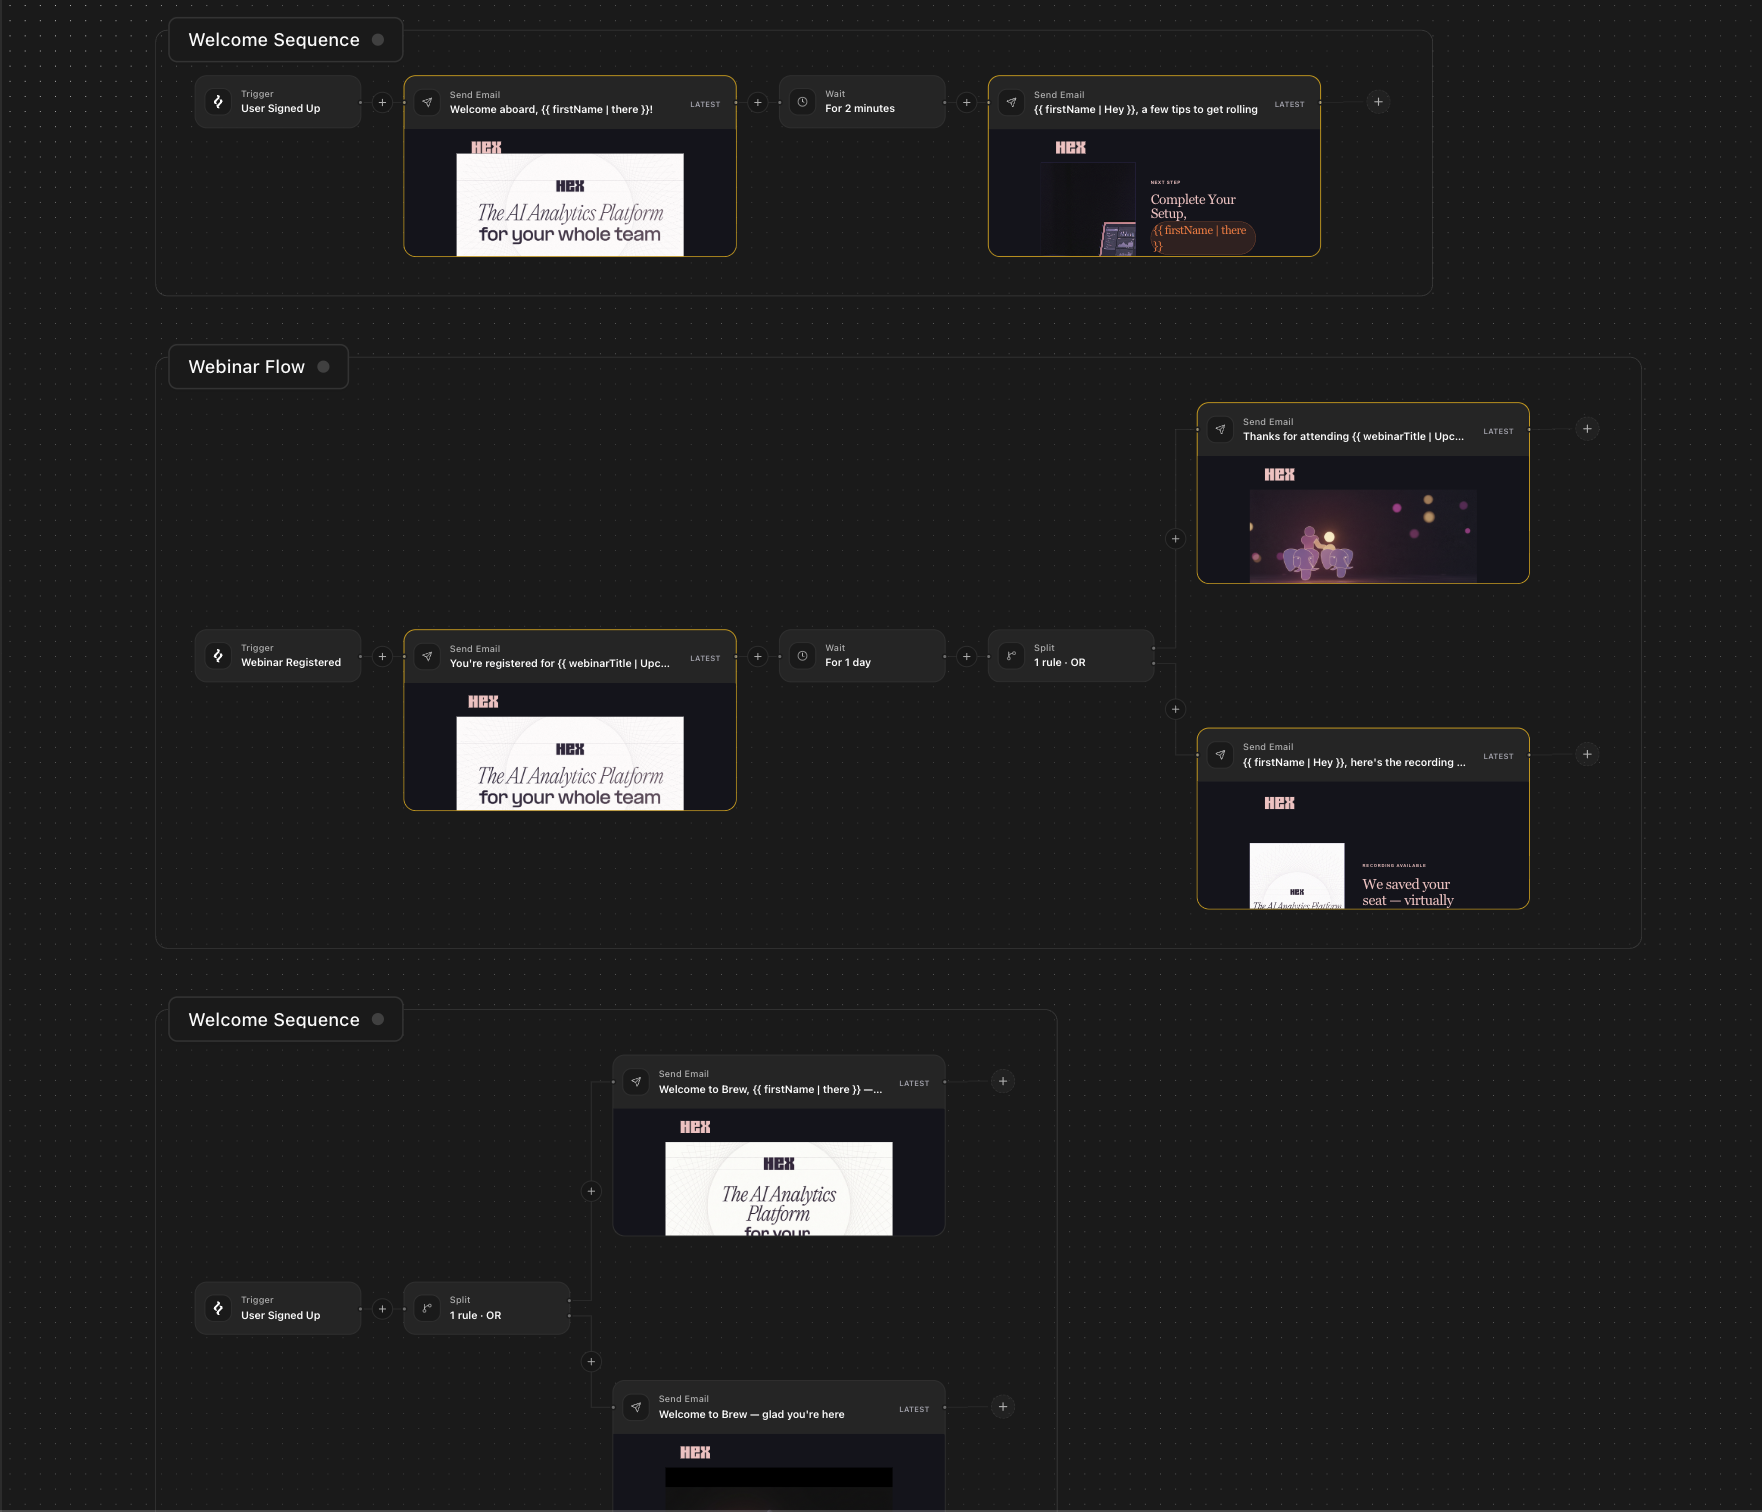
Automations are emails Brew sends in response to events in your business (a signup, a purchase, a payment failure). You build the flow once, and Brew runs it automatically whenever the trigger fires.
*One prompt, an automation that runs forever in the background.*
This is different from [Emails](/create-emails/emails), which are one-off sends you manually schedule to an audience. Not sure which to use? See [Emails vs Automations](/create-emails/emails-vs-automations).
## The Automations List
Opening **Automations** shows a list view, every automation with its status and its trigger, plus a summary count (total, live, draft) at the top. From here you can search your automations, manage trigger events with the **Triggers** button, or start a new flow with **New automation**.
Click an automation to open it on its own canvas. Each automation has a dedicated canvas, the flow you see is always exactly the one you selected from the list, never a shared surface with other flows.
## Two Types of Automation
* **Marketing flows.** Multi-step sequences like welcome flows, onboarding drips, abandoned-cart recovery, and re-engagement. These send over time and respect unsubscribes.
* **Transactional emails.** Single, real-time emails like password resets, order receipts, and account notifications. These are always delivered (even to unsubscribed contacts) because they contain information the recipient needs.
| Use a marketing flow when… | Use a transactional email when… |
| ------------------------------------------------------------ | --------------------------------------------------------- |
| You want a sequence of emails over time | You want one email, sent immediately |
| Timing matters (wait 3 days, then send the next) | The email is essential: the user expects it right away |
| You want to branch based on engagement | The user is unsubscribed but still needs to receive it |
| Examples: welcome flow, onboarding, abandoned cart, win-back | Examples: password reset, order confirmation, login alert |
## Create a Flow
Open **Home** and tell Brew what to build. Be specific about purpose, length, and content.
> *"Build a 3-step welcome flow for new newsletter subscribers. Trigger when someone subscribes. First email: warm welcome and a link to top resources. Wait 3 days. Second email: a short story from a happy customer. Wait 4 days. Third email: nudge to upgrade with a 14-day trial."*
Brew creates the automation and drops you into its dedicated canvas. The canvas shows the trigger, every **Send Email**, every **Wait**, and every branch, laid out left to right. Each email inside the flow edits like a standalone email, but inside the automation's own canvas.
In the top left, the automation's name is a dropdown: the **automation switcher**. Use it to jump between automations or create a new one without leaving the canvas.
The canvas and chat are one-to-one with this flow, so you don't paste the whole automation into chat to change it. Just prompt what you want and Brew edits the flow in place while the canvas updates:
* *"Change the wait to 4 days."*
* *"Add a branch after email 3 with two emails, one for users who clicked and one for those who didn't."*
* *"Make the third email more direct."*
You can also click any node to open its config panel and edit content, wait duration, or filter conditions directly.
A new automation starts as a **Draft**. When the flow is ready, click **Publish** in the canvas header to make it **Live**. Once live, the next matching trigger event starts the flow. To edit safely later, click **Unpublish** to return it to Draft.
[Manual-audience automations](#manual-audience) skip this step: there's nothing to leave running, you launch a run on demand instead.
Each flow run consumes credits. Email sends inside the flow count toward your monthly send limit.
The Automations list shows every flow with its current status and trigger. Click into any flow to open its canvas and see its execution history and investigate failures.
## The Four Node Types
Every flow is built from four nodes plus a trigger.
**Send Email.** Sends an email to the contact running through the flow. For each Send Email node, you can:
* **Generate a new email**: provide a prompt and Brew writes it on-brand
* **Reuse an email from another flow**: references that design (no copy; the node points at a pinned version)
The email is a design; the node references it. Each time a contact reaches a Send Email node, Brew records **one send for that recipient**, so a flow that runs for 500 people produces 500 automation sends, each with its own delivery and engagement events. Those sends show up in [analytics](/analytics/reading-analytics) right alongside your campaign sends.
Best practice: keep each email focused on one outcome. Personalize using contact properties (`{{{firstName}}}`) and trigger payload values (`{{@trigger:output.payload.orderId}}`).
**Wait.** Pauses the flow for a set duration before continuing. Use to space out emails or give time for an action to happen. Choose from preset durations (1 hour, 1 day, 3 days, 1 week) or set a custom value.
**Filter.** Checks whether the contact matches a condition. If they match, they continue. If not, that branch ends for them. Filter on contact properties (plan = "pro"), behavior (opened the previous email), or trigger payload data.
**Split.** Splits the flow into two paths so contacts get different experiences. Each path is its own filter. Contacts go down whichever matches. Common pattern: split based on whether someone clicked an earlier email, so engaged contacts get a deeper sequence and non-engaged contacts get a re-engagement nudge.
## Triggers
Every automation needs a trigger (what starts the flow). When you create an automation, the trigger picker offers three kinds:
* **Connected-source events**: events streamed automatically from integrations like Clerk, Stripe, Stytch, WorkOS, Supabase, Shopify, and RevenueCat
* **Custom HTTP triggers**: events you fire from your own backend with a signed HTTP request
* **Manual audience**: run a saved audience through the flow on demand
Common trigger moments:
* New user signup
* Order placed
* Trial ending soon
* Payment failed
* Cart abandoned
* Subscription canceled
### Changing the Trigger
Click the trigger node on the canvas to open its config panel. From there you can edit the selected trigger, or use **Change trigger** to switch the flow to a different audience or a different event trigger entirely, without rebuilding the rest of the flow.
### Manual Audience
A manual-audience automation doesn't listen for events. Instead, its trigger is a saved [audience](/audience/create-audiences): when you run the automation, every contact in that audience flows through the graph, waits, filters, splits, and sends included.
Treat a manual-audience automation as a **one-off**, not a live, ongoing flow. There's nothing to publish and leave running in the background; you launch a run when you want one. The trigger node shows the audience, its filter query, and the current contact count. While a run is in flight the automation shows **Sending** in the list; once the run completes it shows **Sent**.
Use it when you want the structure of a flow (spacing sends out over days, branching on engagement) but the one-off nature of a regular [Email](/create-emails/emails) send. When you launch a run, you choose when it starts: **Run now**, **Schedule**, or **Gradual send**. See [Send Options](/create-emails/send-options#when-you-launch-an-automation) for details. You can also launch manual-audience runs from the [API](/api-reference/api/api-introduction) or MCP (`run_automation`), including dry-runs that preview the recipient count before anything sends.
## Lifecycle States
The Automations list shows each flow's current state:
| State | Applies to | Meaning |
| ------------ | --------------------------- | -------------------------------------------------------------------------------------- |
| **Draft** | All automations | Being created or edited. Not running. Click **Publish** to set it live. |
| **Live** | Event-triggered automations | Running. New trigger events start the flow. Click **Unpublish** to return it to Draft. |
| **Sending** | Manual-audience automations | A run is in flight: contacts are moving through the flow. |
| **Sent** | Manual-audience automations | The run completed. Launch another run any time. |
| **Archived** | All automations | Halted. No new runs will start. Use when you want to fully stop a flow. |
Next to the status, the canvas header shows a **version chip** (for example `v4` or `v35`). Each save or edit creates a new version, so you have a paper trail of how a flow changed over time.
Unpublishing a live flow keeps its history intact and lets you republish later. Archiving is for flows you no longer need.
## Personalization
Use merge tags anywhere in your emails to pull in contact or trigger data:
| Source | Syntax | Example |
| ---------------- | ------------------------------------- | ------------------------ |
| Contact property | `{{{firstName}}}` | `Hi Alex,` |
| Custom property | `{{{plan}}}` | `Your Pro subscription` |
| Trigger payload | `{{@trigger:output.payload.orderId}}` | `Order #12345` |
| Fallback | `{{{firstName \| there}}}` | `Hi there,` (if no name) |
Variable names are case-sensitive. `{{{firstName}}}` matches a payload field named `firstName`, not `firstname`. Mismatched names render as empty.
## Common Patterns
**Welcome flow.** Multi-step. Triggered when a new user signs up.
> *"Build a 3-step welcome flow triggered by `user_signup`. First email welcomes them and sets expectations. Second email sends a quick-start guide. Third email shares a customer success story."*
**Abandoned cart.** Multi-step. Triggered when a user adds to cart but doesn't check out.
> *"Build an abandoned-cart flow for `cart_abandoned`. First email: friendly reminder with the items. Second email 24 hours later: address common objections. Third email 48 hours later: limited-time discount."*
**Password reset.** Transactional. Triggered when a user requests a reset.
> *"Create a password reset email triggered by `password_reset_requested`. Include the recipient's first name and a `resetUrl` button. Keep it short and security-focused."*
**Order confirmation.** Transactional. Triggered when an order is placed.
> *"Create an order confirmation email triggered by `order_placed`. Include the recipient's first name, order number, items, total, and shipping ETA."*
**Re-engagement.** Multi-step. Triggered on a schedule for inactive contacts.
> *"Build a 3-step re-engagement flow. First email: 'We miss you' with new features. Second email three days later: ask what content they'd prefer. Third email: final chance to stay subscribed."*
## Trigger Events
Trigger events are the signals that start your automations. Brew supports two kinds:
* **Custom events** (shown as **Custom HTTP trigger** in the trigger picker). Events you define and fire from your backend with a signed HTTP request (e.g. `user_signup`, `order_placed`).
* **Built-in events.** Events automatically discovered from connected sources, like Stripe billing events.
Manage both from the **Settings** link in the trigger panel, or press **Cmd+K** and search for *Trigger events*.
### Custom Events
Open **Trigger events** from the trigger panel settings link or Cmd+K, then click **Create event**. Give it a clear, specific name.
Good: `user_signup`, `order_placed`, `subscription_renewed`
Avoid: `event1`, `trigger`, `do_thing`
Add the fields your event will send and mark which are required. Brew validates incoming events against this schema and rejects events that don't match.
Keep payloads flat. Avoid nested objects when you can, flat payloads are easier to use in email templates.
Good:
```json theme={null}
{
"email": "alex@example.com",
"firstName": "Alex",
"orderId": "ORD-12345",
"plan": "pro"
}
```
Avoid:
```json theme={null}
{
"user": { "email": "alex@example.com", "name": "Alex" },
"order": { "id": "ORD-12345" }
}
```
Send events to Brew's API with an API key (create one in **Settings → API**). See the [API Reference](/api-reference/api/api-introduction) for the exact contract.
In any automation, pick this event as the trigger. Brew populates the trigger node with your schema so you can reference payload fields in emails using `{{@trigger:output.payload.fieldName}}`.
Send a test event from the **Trigger events** page. The test runs through your published automations exactly like a real event would, so you can verify the flow end-to-end before going live.
### Trigger Best Practices
**Use descriptive event names.** Names should describe the action. `user_signup` and `order_placed` are clear. `event1` is not.
**Keep payloads flat and minimal.** Flat payloads are easier to map to merge tags and easier to maintain. Only include fields you'll actually use.
**Validate types in your schema.** Mark fields as `string`, `number`, `boolean`, etc. Brew rejects invalid payloads before they trigger anything, surfacing problems early.
### Connected-source Events
Several integrations stream events into Brew automatically. Connecting a provider provisions the **full event catalogue** in one step: every supported event becomes a fireable trigger immediately. There's no per-event enable step. The integration's **Manage** tab (Integrations → click the provider) is a read-only catalogue plus a live **Recent events** stream so you can verify webhooks are flowing. Whether an event actually fires emails is gated entirely by whether at least one **Live** automation is wired to it. To stop an event from firing, unpublish the automation; to stop every event from the provider, disconnect the integration.
| Source | What it covers | Event count |
| --------------------------------------------- | ---------------------------------------------------------------------------------- | ----------- |
| [Clerk](/integrations/import/clerk) | User signups, organization activity, paid subscriptions, waitlist entries | 13 |
| [Stripe](/integrations/import/stripe) | Subscriptions, invoices, checkouts, refunds, quotes | 22 |
| [Stytch](/integrations/import/stytch) | Consumer (B2C) and B2B auth: user lifecycle, member changes, orgs | 8 |
| [Supabase](/integrations/import/supabase) | `auth.users` raw and derived events (email confirmed, password changed, banned, …) | 12 |
| [WorkOS](/integrations/import/workos) | SSO users, password reset, organizations, SCIM directory sync | 18 |
| [Shopify](/integrations/import/shopify) | Customer, order, checkout, cart, fulfillment | 15 |
| [RevenueCat](/integrations/import/revenuecat) | In-app purchases + subscriptions across App Store, Play Store, Stripe, Web Billing | 11 |
Stripe is one of several event-trigger integrations. See the full list on the [Integrations overview](/integrations/integrations) (Clerk, Shopify, WorkOS, Supabase, RevenueCat, Stytch, Stripe). Once you've connected any of them, Brew automatically listens for the relevant events. You don't need to configure them, they show up as available triggers in the automation builder.
Common pattern: trigger a "payment failed" dunning sequence on `invoice.payment_failed`, or kick off an onboarding flow on `customer.subscription.created`.
Brew only listens for events from connected sources. It never charges customers, modifies subscriptions, refunds payments, mutates auth records, or changes Shopify orders.
### Stripe Events
Brew supports **22 Stripe events** across **checkout, customer, subscription, invoice, quote, and payment**. See the [Stripe integration page](/integrations/import/stripe) for the full event list, setup walkthrough, personalization variables, and common patterns.
### What Happens When a Payload Fails Validation
If an event arrives with missing required fields or wrong types, Brew returns a `400 INVALID_PAYLOAD` error and does not start the automation:
```json theme={null}
{
"error": {
"code": "INVALID_PAYLOAD",
"message": "Payload validation failed",
"details": [
{ "field": "orderId", "message": "Required field 'orderId' is missing" }
]
}
}
```
Fix the payload on your side and re-send.
## Need help?
Our team is ready to support you at every step of your journey with Brew. Choose the option that works best for you:
Type in the "Ask any question" search bar at the top left to instantly find relevant documentation pages.
Click "Open in ChatGPT" at the top right of any page to analyze documentation with ChatGPT or Claude for deeper insights.
Book time with our founders for personalized guidance on strategy, best practices, or complex implementation questions.
Need immediate assistance? Reach us at **+1-(332)-203-2145** for urgent issues or time-sensitive questions.
Our preferred support channel. You'll receive an invite after signup for direct founder support and fast responses.
Contact us at **[support@brew.new](mailto:support@brew.new)** for detailed inquiries or if you prefer not to use Slack.
 Automations are emails Brew sends in response to events in your business (a signup, a purchase, a payment failure). You build the flow once, and Brew runs it automatically whenever the trigger fires.
*One prompt, an automation that runs forever in the background.*
This is different from [Emails](/create-emails/emails), which are one-off sends you manually schedule to an audience. Not sure which to use? See [Emails vs Automations](/create-emails/emails-vs-automations).
## The Automations List
Opening **Automations** shows a list view, every automation with its status and its trigger, plus a summary count (total, live, draft) at the top. From here you can search your automations, manage trigger events with the **Triggers** button, or start a new flow with **New automation**.
Click an automation to open it on its own canvas. Each automation has a dedicated canvas, the flow you see is always exactly the one you selected from the list, never a shared surface with other flows.
## Two Types of Automation
* **Marketing flows.** Multi-step sequences like welcome flows, onboarding drips, abandoned-cart recovery, and re-engagement. These send over time and respect unsubscribes.
* **Transactional emails.** Single, real-time emails like password resets, order receipts, and account notifications. These are always delivered (even to unsubscribed contacts) because they contain information the recipient needs.
| Use a marketing flow when… | Use a transactional email when… |
| ------------------------------------------------------------ | --------------------------------------------------------- |
| You want a sequence of emails over time | You want one email, sent immediately |
| Timing matters (wait 3 days, then send the next) | The email is essential: the user expects it right away |
| You want to branch based on engagement | The user is unsubscribed but still needs to receive it |
| Examples: welcome flow, onboarding, abandoned cart, win-back | Examples: password reset, order confirmation, login alert |
## Create a Flow
Automations are emails Brew sends in response to events in your business (a signup, a purchase, a payment failure). You build the flow once, and Brew runs it automatically whenever the trigger fires.
*One prompt, an automation that runs forever in the background.*
This is different from [Emails](/create-emails/emails), which are one-off sends you manually schedule to an audience. Not sure which to use? See [Emails vs Automations](/create-emails/emails-vs-automations).
## The Automations List
Opening **Automations** shows a list view, every automation with its status and its trigger, plus a summary count (total, live, draft) at the top. From here you can search your automations, manage trigger events with the **Triggers** button, or start a new flow with **New automation**.
Click an automation to open it on its own canvas. Each automation has a dedicated canvas, the flow you see is always exactly the one you selected from the list, never a shared surface with other flows.
## Two Types of Automation
* **Marketing flows.** Multi-step sequences like welcome flows, onboarding drips, abandoned-cart recovery, and re-engagement. These send over time and respect unsubscribes.
* **Transactional emails.** Single, real-time emails like password resets, order receipts, and account notifications. These are always delivered (even to unsubscribed contacts) because they contain information the recipient needs.
| Use a marketing flow when… | Use a transactional email when… |
| ------------------------------------------------------------ | --------------------------------------------------------- |
| You want a sequence of emails over time | You want one email, sent immediately |
| Timing matters (wait 3 days, then send the next) | The email is essential: the user expects it right away |
| You want to branch based on engagement | The user is unsubscribed but still needs to receive it |
| Examples: welcome flow, onboarding, abandoned cart, win-back | Examples: password reset, order confirmation, login alert |
## Create a Flow